Laser Jammer / Blinder
Annoying things these Laser Guns. Don't get me wrong, i don't condone speeding in built areas at all, but out on the open road, hell, why not open the car up alittle. On the Isle of Man for instance, the national speed limit means NO speed limit, alright for some huh? Unfortunately, try it here in the UK and you`ll end up in deep water, unless that is, you tip the odds in your direction.
The Blinder M10 Twin (at the time also sold as the Snooper SLD920) is one such tool you can use to help tip these odds in your direction.
Its a laser Jammer, or "diffuser" if you like.When it senses a lasar gun been pointed at your car, it basically "fires" back at it with lots of lasers, these in turn "confuse" the radar gun, and as such prevent the user of the gun from getting a reading on the speed of your car, which then gives you time to adjust your speed, cool eh?

The units arrived in a plain white box, neatly packed with full fitting instructions included. Also included are a speaker and switch, more on these further down the page.Evry thing certainly seems wel made, and according to the blurb, spare covers/faces are available in the event of stone chips or damage.

Fitting the Blinder is simple enough, one of the hardest things is actually finding a way into the cabin from the engine bay.If your car doesn't have air con, then the easiest route is behind the glove box.However, if it has, then may i suggest under the drivers clutch peddle, where the water feed pipe for the windscreen washer jets passes through?

I used a terminal screw driver to poke a hole through the grommet, and then a stiff piece of wire after that, so that i had something to use as a draw wire.I then proceeded to tape up the three main control wires for the Blinder, so as to make a loom, and then pulled them through the grommet into the engine compartment.
You can see the white piece of cable that i used as a draw wire in the photo to the left.

Once into the engine compartment, i ran them along under the air con pipes, to behind the offside headlamp unit.You can see the ty-wraps i used if you look closely.

These are the two main units, all taped up into separate looms ready for installation.Take note to write down the serial numbers and other details from the back of these units before you install them, as these details will be needed to register the units.

Fixing the units turned out to be extremely simple.I was at first going to stick the units into position, but once i actually though about it, it was simpler and easier to fix them "properly" using the supplied brackets and self drilling screws.Top marks to Blinder for including these in the kit.
As you can see in the picture opposite, i used a long extension and Phillips bit attached to a battery drill to fix the units into place, i cannot even start to describe how easy this was to do.
As you can see in the picture opposite, i used a long extension and Phillips bit attached to a battery drill to fix the units into place, i cannot even start to describe how easy this was to do.

Once fitted the units are very secure, and sit behind the grill waiting to be activated.One thing i did do, was to plae a nice big blob of silicone sealer on top of where the wires exit the rear of the units, so as to help prevent ingress of water.I`ve also been reliably informed that its here that they will start to rust too.
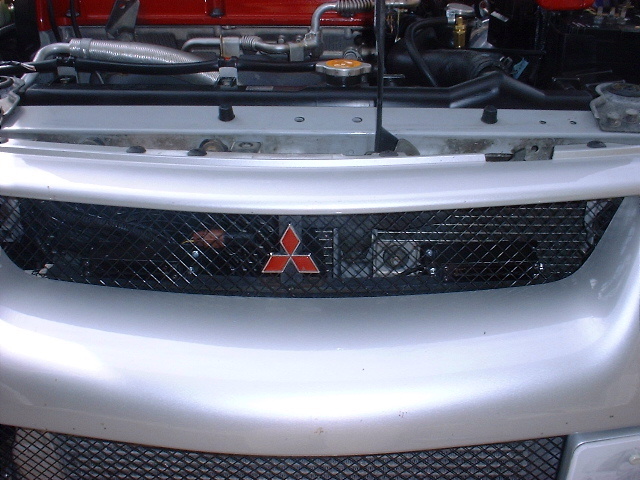
For the time been i`ve left the mesh in place, but i might end up having to cut a "window" in it for the two units to see out of. (Part No. MR478354 if you need to replace it when the blinder is removed.)

I joined the looms from the main two units to the loom that goes into the cabin.I used blue through crimps, and a 6mm eyelet crimp for the earth connection, which nicely fastened in with a set of original earth behind the filling spout of the inter-cooler spray bottle.

Inside the cabin i replaced the switch that comes with the Bilnder units for an illuminated one that i bought from Demon Tweeks.This gives you peace of mind that you`ve actually got the system turned on, as the LED is bright enough to see on a sunny day, unlike the original switch which although of high quality has no LED.

There is also a small speaker supplied.
It has two functions, firstly to tell you the unit is turned on, in a reassuring way rather than annoying i hasten to add, and secondly to warn you when the units are operating, i.e. your been targeted by a laser gun! At this point you adjust your speed and turn the unit off to avoid suspicion ;)
I`ve positioned this directly in front of the instrument panel, so as to get a loud warning enough warning and at the same time for ease of installation.
UpDate: Test Results!!!!!!!!


Firstly A BIG THANKS to BuRR from Scoobynet for arranging this test, and secondly to his "friends" who kindly lent us the use of their ProLasar II for the morning. Without either of these people this test would have never come about.
I arrived late to the test (no surprises there then!), i could see everyone pulled up in a layby at the side of the road, and so booted the car off the roundabout i was on and headed towards them. This was the first surprise of the day.
When you first turn the Blinder unit on it self tests, and you hear an audible warbling bleep. Now unknowingly to me when i left the roundabout they were already prepared and were targeting my car; all of of a sudden the Blinder unit starts making a constant tone, which i`d upto that point not heard before. My first reaction was that something was amiss and it was faulty, turns out nothing was wrong and that is the sound that the unit makes when "in use". Theres nothing in the instructions about this change in sound between "self test" and "in use" so be aware of it, Up until today i was fully expecting to hear the warbling sound!
Second surprise of the day was the fact that the Blinder unit worked faultlessly for me. I had in the boot screwdrivers, socket set and battery drill in preparation for a bit of tweaking, more so as my two units were hidden behind the front grill. No need for them at all! Brilliant!
The road we were testing on was a straight private road, which bends to the right as you look at it through the ProLasar`s sights. As you round the bend, you cannot hardly see the layby, never mind anything parked in it, so a good place. First test i did was at 80, slowing to 50 when the Blinder unit went off. Second time i rounded the corner at 120, hitting the brakes hard so as to get the nose of the car to dive and test the spread of the Blinder units to their limit. Again the units worked impeccably, and BuRR was unable to get a lock on me until i was virtually along side him! A few more runs were done at various speeds and the unit never failed to work.
Others weren't quite so good, BuRRs units required alittle tweaking (moving) so as to get them to "cloak" him fully, an MY02 STi Impreza was also hit and miss, this i believe to be something to do with the mounting height. Both the Impreza had the units fitted next to the number plate, mine are above the plate in the upper grill. Certainly the units on the Evo are fit and forget, the Impreza also, depending on mounting position.
Other interesting finds of the day were that the Bel990i lasar detector is useless against Lasar Guns. By the time it went off, the gun was already locked on and you would be caught. We even tested the "splash" theory were for example what if you was driving behind a car that was been targeted, would the Bell pick up the lasers "splash".....errr..... no! The bel990i didn't go off even under these circumstances. Bare in mind the ProLasar II has a footprint of only 3.5sq/ft at 1000yrds and you`ll start to understand why.
So the day was a total success, I can fully recommend the Blinder M10 Twin for those who like to enjoy their cars to the max, without the fear of been caught for doing 90 on an empty motorway or where ever else the local police decide they need a few more coffers in the jar.
